Does your document have bleeds?
Why are bleeds important?
When someone says “bleed,” the initial thought to the average person is loss of blood due to an injury. In the world of printing, bleed takes on a whole different meaning (other than the annoying paper cut).
Bleed, in printing terms, is any ink that wants to reach the outer edge of a document. If a designer wants a photo or color to extend beyond the margins, the document file will need bleeds and here is an explanation.
While L & D Mail Masters has high-quality presses and printers, there is no way thousands of pieces of paper can feed through machines with perfect alignment each time. While our printers and cutters hit the marks at a high rate, there needs to be wiggle room. If even the cutter is off by a hair-line, white may appear on the piece.
To complete this journey, one should know that when a document has bleeds, we don’t print on the exact finished size. If you have a simple letter (8.5×11) that features bleeds, our production team prints on a larger size paper, then cuts down to the final measurements. Machine cutters at L & D Mail Masters have the capability to handle a larger volume of papers at one time to cut pieces down to size. If there is no added bleed to the document, there is a risk of even a sliver of white showing up on the final product. No one wants that.
To accomplish the perfect product, there needs to be a bleed zone on the digital (PDF) file. Most common uses of bleeds include postcards, letters, business cards or any other piece printed on paper.
Documents essentially have three zones – safe, margin and bleed – when starting a blank canvas. Dissecting the set-up of a document, let’s delve into what a 5×7-inch postcard looks like stripped down.
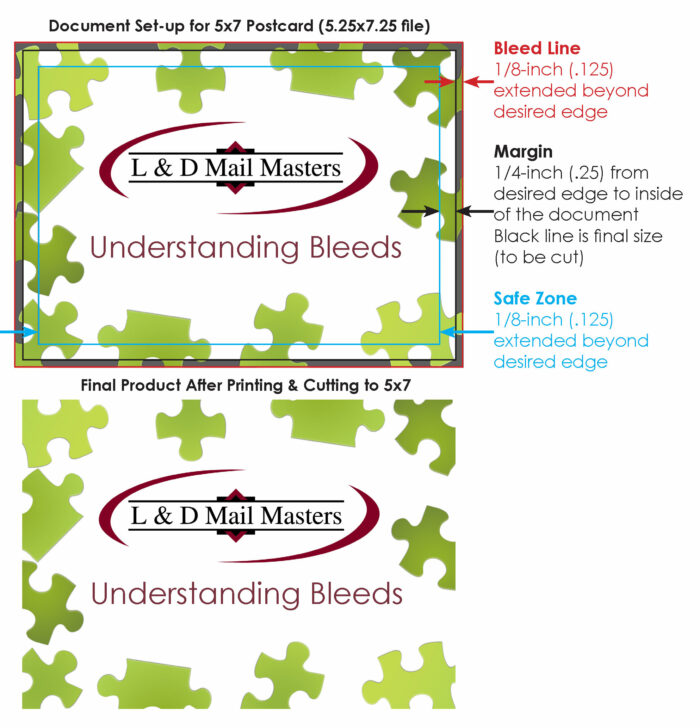
Margin
The margin area for the majority of print pieces is a ¼ inch that wraps around the edge of the piece on the inside of the projected cut line. This creates a buffer area.
Safe Zone
This is where the heart of the content lays on the piece. All the text on the document and graphic element should be within this 4.5×6.5-inch buffer area. This space is created by setting the margin.
Here comes the question of if you want a bleed, or no bleed? If content with keeping the art within the 4.5×6.5-inch area, simply leave the buffer zone blank (white). Otherwise, the need for a bleed will extend your content area.
Bleed
In order to utilize this added ink space, bleed zones need to be created. A suggested amount of bleed space is 1/8th of an inch (.125). Depending on the software program, bleeds can be added in the document settings, or bank on doing a little math. With the bleed, you will need to add the 0.125 to the size, meaning the file should be set up as a 5.125×7.125. Be sure to create temporary guides for the margins and cut lines if doing this method.
While designing, keep in mind the bleed area will be axed at final cutting at our print shop. Be aware of any text that creeps past the safe zone and near the edge of the document. In addition to text, pay special attention to photos, because you don’t want to make cuts where you didn’t intend to crop an image.
The final product
Here is a little inside info on how the production team at L & D Mail Masters operates. Once we have the art (we can design it for you if needed), our graphic design team does the final prepress set up for our printers. They then export a file with crop/cut marks indicated on the outside of the piece (remember we print on an oversize paper) to the print production team. Once printed, those crop marks will be guides for the cutting department. Upon the final slice, the piece gets ready for its destination. If you have more questions about bleeds and margins, our print specialist are available to answer any questions. We can offer templates and guides if needed as well.

